
Morris Minor Forum
Rebuilding suspension
Posted by drooartz


|
pixelsmithusa
Gerard C
San Francisco, USA
Sign in to contact
1937 Chevrolet Master Deluxe
1946 Austin 10 1953 Morris Minor Series II 1960 Austin-Healey Bugeye Sprite & more |
Apr 14, 2018 01:46 AM
Joined 14 years ago
1,432 Posts
|
Here's an example of what I did with the Traveller
Gerard
http://gerardsgarage.com/
Edited 1 time(s). Last edit at 2018-04-14 01:53 AM by pixelsmithusa.
Gerard
http://gerardsgarage.com/
Edited 1 time(s). Last edit at 2018-04-14 01:53 AM by pixelsmithusa.
Attachments:
DSCF2825.jpg 47.1 KB


drooartz
Drew Frink
Mountains, UT, USA
Sign in to contact
1959 Austin-Healey Bugeye Sprite "Penny"
1966 Morris Minor 1000 Saloon (4-door) "Maggie" 1970 MG MGB |
Topic Creator (OP)
Apr 14, 2018 09:23 PM
Joined 17 years ago
188 Posts
|
about 2 weeks and 23 hours later...
|
drooartz
Drew Frink
Mountains, UT, USA
Sign in to contact
1959 Austin-Healey Bugeye Sprite "Penny"
1966 Morris Minor 1000 Saloon (4-door) "Maggie" 1970 MG MGB |
Topic Creator (OP)
Apr 29, 2018 08:47 PM
Joined 17 years ago
188 Posts
|
Finally getting back to this after a little while (had to finish a motorcycle project and build myself a work bench). Got the LH side cleaned and ready for paint, should get that done later this week. Also checked the LH side at the eyebolt hole, and no cracking on this side. Working one side at a time so I don't mix up parts inadvertently.
I've got 4 new shocks sitting in a box in the shop too, so once I get this painted up I can do some installing. Need to figure out a little painting area in the shop (so I don't paint my cars) or go back to my go-to method of painting them outside on my yard trailer.
Cleaned and ready for paint.

So nice to have some bench space again. 9.5' bench, plus another 4' or so with the tool box.

I've got 4 new shocks sitting in a box in the shop too, so once I get this painted up I can do some installing. Need to figure out a little painting area in the shop (so I don't paint my cars) or go back to my go-to method of painting them outside on my yard trailer.
Cleaned and ready for paint.
So nice to have some bench space again. 9.5' bench, plus another 4' or so with the tool box.
|
drooartz
Drew Frink
Mountains, UT, USA
Sign in to contact
1959 Austin-Healey Bugeye Sprite "Penny"
1966 Morris Minor 1000 Saloon (4-door) "Maggie" 1970 MG MGB |
Topic Creator (OP)
May 2, 2018 08:44 PM
Joined 17 years ago
188 Posts
|
Got the other side disassembled and cleaned, so now it's time to paint a few things and get it all back together. Hoping to have the front all buttoned up sometime next week. Still waiting on some brake parts, but all other suspension bits (including rebuilt shocks from PeterC) are in hand.
I've got new tie rod ends as well, but those may have to wait. I leave on my trip in a little over 3 weeks, and need to be realistic about how much I can get done and still have the car ready to go. Day job gets in the way...
I've got new tie rod ends as well, but those may have to wait. I leave on my trip in a little over 3 weeks, and need to be realistic about how much I can get done and still have the car ready to go. Day job gets in the way...
|
drooartz
Drew Frink
Mountains, UT, USA
Sign in to contact
1959 Austin-Healey Bugeye Sprite "Penny"
1966 Morris Minor 1000 Saloon (4-door) "Maggie" 1970 MG MGB |
Topic Creator (OP)
May 8, 2018 08:33 AM
Joined 17 years ago
188 Posts
|
Some more progress to report. All parts are now painted and ready to go on the car. Hoping to get working on that later this week. Everything is ready to go, just need the time to do the install. Any tips I should know?
I did have a question on the little cup that fits into the rear suspension arm at the eyebolt. It seems a very tight fit, should that get pressed/tapped into that rear arm first, or should it all go together easily?
Also got my new/rebuilt shocks installed in the front. Is there a torque spec for the mounting bolts, or just really tight? Nothing listed in the factory manual that I could find.
|
May 8, 2018 10:02 AM
Joined 11 years ago
6,030 Posts
|
|
I bet your proud of your engine room aren't you Drew 
Just feel those suspension bolts until they start to feel nice and tight,
and then bend the tab washers over.
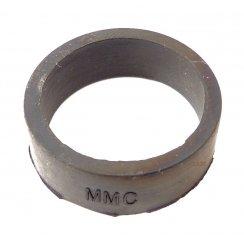
I can't place what you mean when you ask about "the little cup that fits into the rear suspension arm"
Is this it please?
Edited 1 time(s). Last edit at 2018-05-08 10:21 AM by 0123.
Just feel those suspension bolts until they start to feel nice and tight,
and then bend the tab washers over.
I can't place what you mean when you ask about "the little cup that fits into the rear suspension arm"
Is this it please?
Edited 1 time(s). Last edit at 2018-05-08 10:21 AM by 0123.
Attachments:
ferd 5.JPG 6.2 KB
|
May 8, 2018 11:34 AM
Top Contributor
Joined 14 years ago
4,921 Posts
|
|
The cup is a light press fit into the arm. It is possible to drive the thicker arm onto the washer and most of us do that, but is not the "official" procedure. That's the reason the connection at the cross member is as it is. The torsion bar is enters the hole in the cross memeber so that the inner pin can be pushed through the bushings of the eyebolt. However, the rear spline and arm are usually very rusty and don't tend to move. After all these years I'm considering on making some tools to make disassembling and assembling the suspension easier and safer. In this case some kind of leverage needs to be anchored to the thicker arm so that the inner pin and cup assembly can be pressed into the arm.
|
drooartz
Drew Frink
Mountains, UT, USA
Sign in to contact
1959 Austin-Healey Bugeye Sprite "Penny"
1966 Morris Minor 1000 Saloon (4-door) "Maggie" 1970 MG MGB |
Topic Creator (OP)
May 8, 2018 11:39 AM
Joined 17 years ago
188 Posts
|

|
drooartz
Drew Frink
Mountains, UT, USA
Sign in to contact
1959 Austin-Healey Bugeye Sprite "Penny"
1966 Morris Minor 1000 Saloon (4-door) "Maggie" 1970 MG MGB |
Topic Creator (OP)
May 8, 2018 11:46 AM
Joined 17 years ago
188 Posts
|
Thanks, Jim. I think I can see how it all goes together. I'll post more pics if I get lost... 
In reply to # 29980 by emjay
The cup is a light press fit into the arm. It is possible to drive the thicker arm onto the washer and most of us do that, but is not the "official" procedure. That's the reason the connection at the cross member is as it is. The torsion bar is enters the hole in the cross memeber so that the inner pin can be pushed through the bushings of the eyebolt. However, the rear spline and arm are usually very rusty and don't tend to move. After all these years I'm considering on making some tools to make disassembling and assembling the suspension easier and safer. In this case some kind of leverage needs to be anchored to the thicker arm so that the inner pin and cup assembly can be pressed into the arm.
|
May 8, 2018 11:55 AM
Top Contributor
Joined 14 years ago
4,921 Posts
|
|
|
May 8, 2018 12:17 PM
Joined 11 years ago
6,030 Posts
|
|
|
May 8, 2018 12:50 PM
Top Contributor
Joined 14 years ago
4,921 Posts
|
|
Another observation. On the outer pin the chamfered washers should have the chamfers inward. They are very helpful so that the washer goes inside the rubber seal ring. It's also a goo idea to check the length of this pin to the length of the lower trunnion. If the shoulders are significantly outside the tunnion bushings, the trunnion can slide back and forth and be very noisy. I've never checked for a spec but it's probably something like nil to .001in, maybe .005in.
Edited 1 time(s). Last edit at 2018-05-08 12:54 PM by emjay.
Edited 1 time(s). Last edit at 2018-05-08 12:54 PM by emjay.
|
drooartz
Drew Frink
Mountains, UT, USA
Sign in to contact
1959 Austin-Healey Bugeye Sprite "Penny"
1966 Morris Minor 1000 Saloon (4-door) "Maggie" 1970 MG MGB |
Topic Creator (OP)
May 10, 2018 09:19 PM
Joined 17 years ago
188 Posts
|
Got things (loosely) installed into the car today. Nothing is tightened up, and the torsion bars are not installed. Just wanted to make sure it all fit -- and wanted to post pics here to make sure I have things back together correctly. Assuming that is the case I can work on the final install over the next couple days.
So, do these look ok?


So, do these look ok?
|
May 11, 2018 01:16 AM
Joined 11 years ago
6,030 Posts
|
|
|
drooartz
Drew Frink
Mountains, UT, USA
Sign in to contact
1959 Austin-Healey Bugeye Sprite "Penny"
1966 Morris Minor 1000 Saloon (4-door) "Maggie" 1970 MG MGB |
Topic Creator (OP)
May 12, 2018 12:21 PM
Joined 17 years ago
188 Posts
|
Having trouble posting or changing forum settings?
Read the Forum Help (FAQ) or click Contact Support at the bottom of the page.
